
Smarter Navigation – 20 Top Tips for Trouble Free Navigation

Being able to navigate accurately in the mountains in all conditions is one of the most important skills you can learn as a hillwalker. Mountain Rescue teams are regularly called out to hikers who have become disorientated by poor visibility in the mountains. Always carry a map and compass, and have the skills to use them.
However, even the best navigators can make mistakes. By following the tips given below you can avoid making some of the common navigation errors and minimise the chances of becoming disorientated in the mountains.
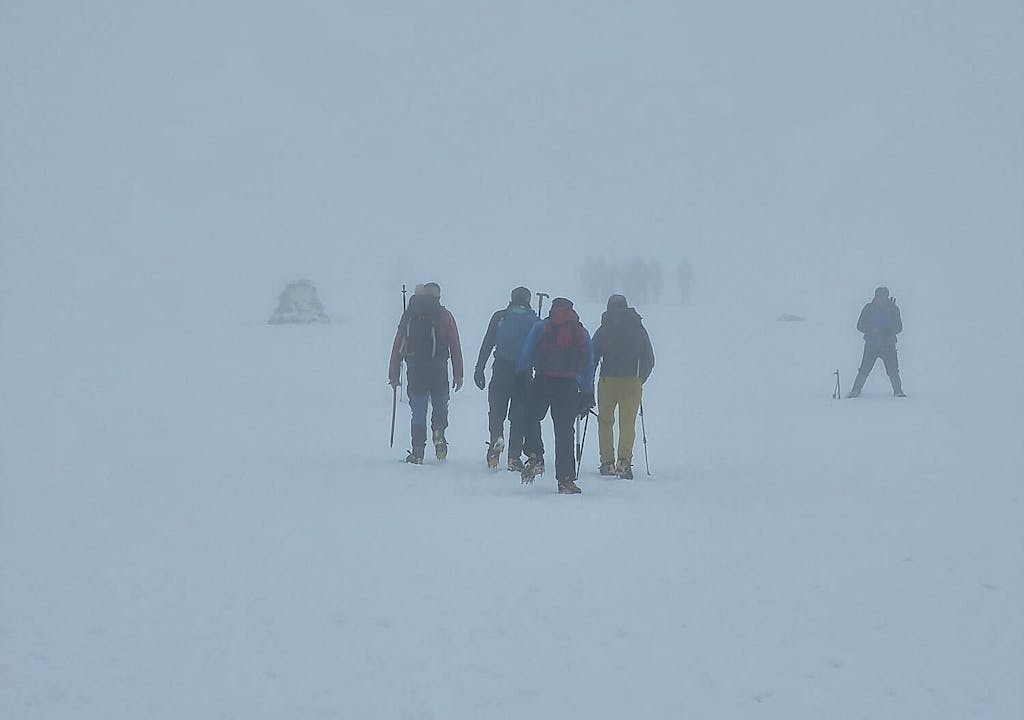
Navigating in poor visibilty in winter
- Prepare your navigation ‘office’ before you set off. Keep your compass handy in a pocket and attach it to yourself or your rucksack via the lanyard (never place around your neck).
Put your paper map in a map case for protection, fold or cut it to the area you are planning to hike in, so it’s easy to read. Keep it in another pocket in your jacket, it’s no good trying to rummage around in your pack for these important items when you are on a windy and wet mountainside. Carry a spare map in your pack (or on your phone) in case you lose your main map.
2. In poor visibility, always orientate, (also called setting), the map at the beginning of a navigation leg to determine your direction of onward travel. You may think you know the right direction to go, but a short distraction for a photograph or a snack and you can quickly become disorientated and head off in the wrong direction.
Place your compass on the map and rotate both together until the red end of the magnetic needle on the compass points to the top (north) on the map. North on the map is now (approximately) lined up with north on the ground.
Orientating the map correctly will ensure you leave in the direction you intended to.
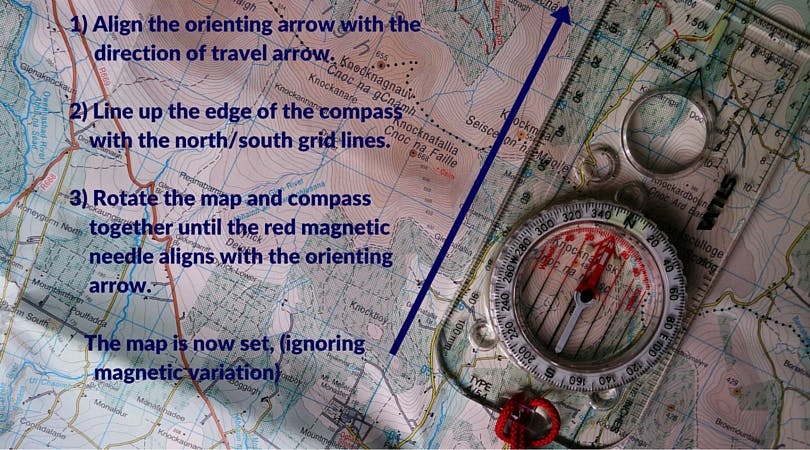
Orienting the map is a simple but essential skill to master
3. Make sure you keep your compass away from magnetic and metallic objects at all times, and especially when taking and walking on a bearing. They will deflect the magnetic needle in the compass and lead to navigational errors you won’t be able to correct later. Mobile phones and smart watches will contain magnets and are a particular source of errors when navigating.
Long term exposure of your compass to a magnetic source, such as your mobile phone, can result in permanent damage and reversed polarity of the needle, so store your compass in a location well away from your phone and other electronic devices.
When navigation with a compass is likely to feature a lot in your day, it’s a good idea to take a second compass as a spare, in case of a mishap.
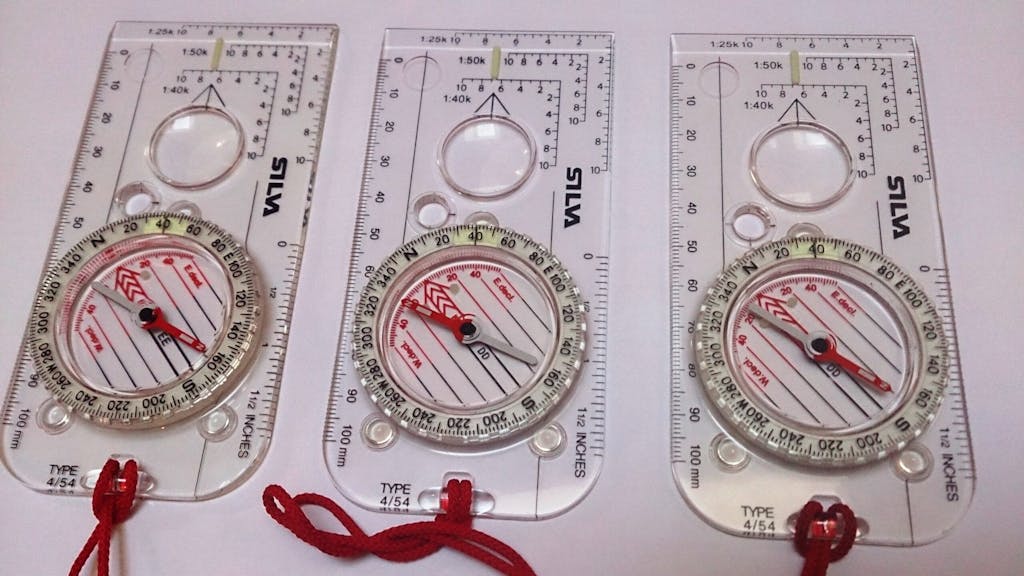
Reversed polarity can cause major problems when navigating (see middle compass)
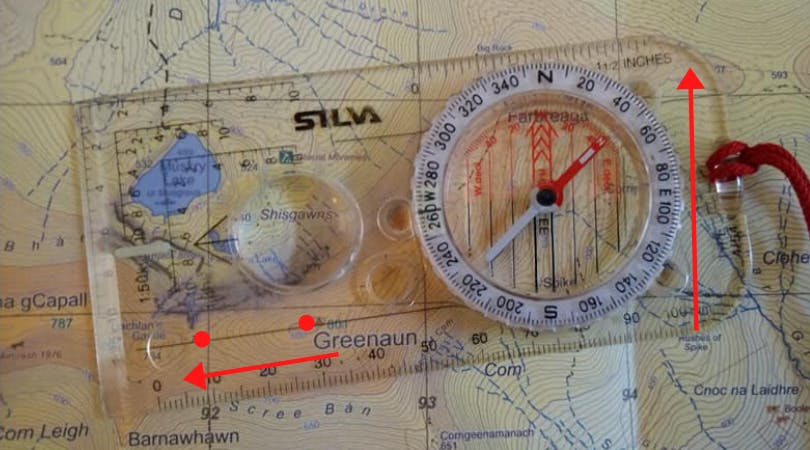
4. Remember to measure the distance from your start point to the target on your map. Check the scale of your map to make sure you have the right conversion. Remember on a 1:50 000 scale map, 1mm measured on the map is equivalent to 50 metres on the ground, on a 1:25 000 scale map 1mm is equivalent to 25 metres on the ground. The clue is in the scale.
Alternatively, you can measure using the Romer on your compass, this makes the maths easier but it less accurate than using the millimeter scale.
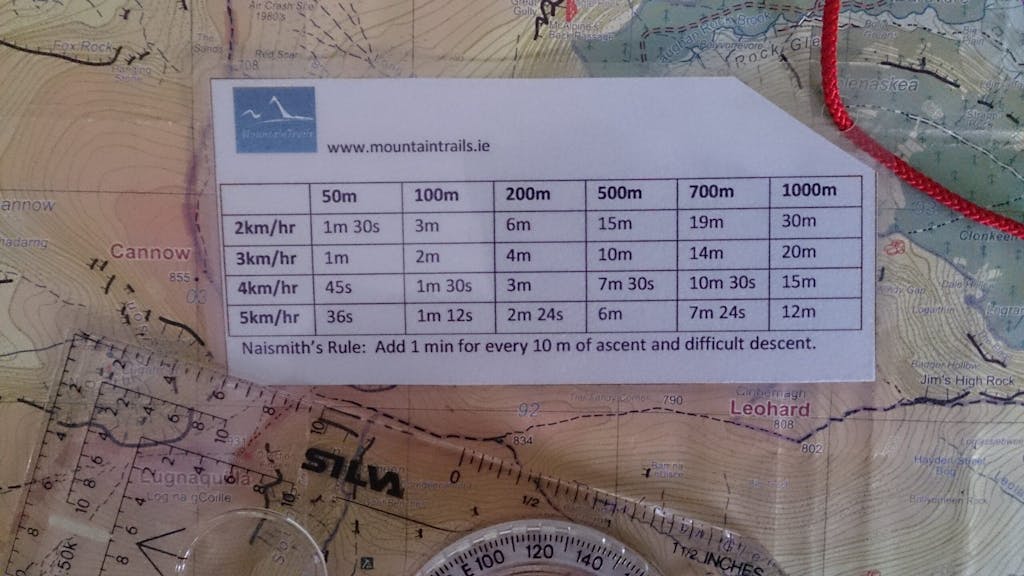
Timing cards make calculations easy and error free
5. It’s a good idea to keep a timing card in your pocket or map case. This has written on it the time it takes to walk over a range of distances at a variety of walking speeds. Estimate your walking speed and determine how long it will take to walk the distance you have measured for the leg.
It will speed up your calculations and help eliminate errors when you might be cold and tired on the mountain.
6. ‘Contours are king’, always check the contours on the map along your intended line of travel. Is the ground going up or down? Is it dropping to the right or rising to the left? Are you in or are you crossing one of the 4 recognised contour features during the leg (these are a summit, saddle, spur and re-entrant).
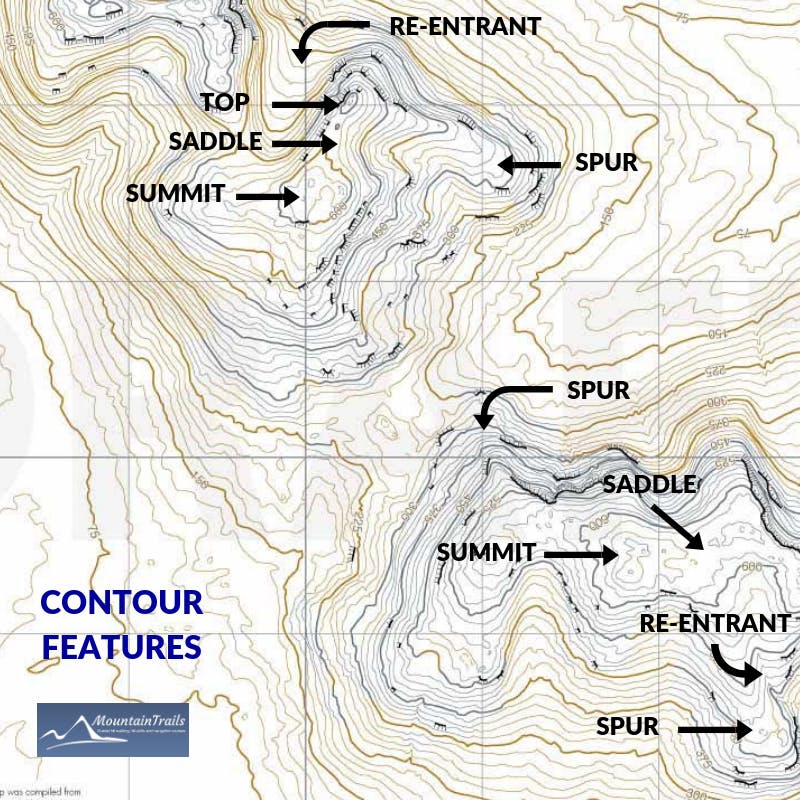
Learning to interpret the contours on the map is a top skill when navigating
7. Always check the contour interval (vertical distance between the contours) on your map before determining the height gain or loss. On most maps it is 10 metres but it can be 5 metres (EastWest maps) or even 15 metres (Harveys maps). To check your maps contour intervals, find a spot on the map where the contour heights are written and check it there.
8. Try to complete a route card before your hike. On here you can put important information such as your navigation legs, distances, height gain and important bearings.
This will avoid fiddly compass work in a possibly wet and windy location, and will reduce the chance of errors. Keep it handy in your map case, behind your map.
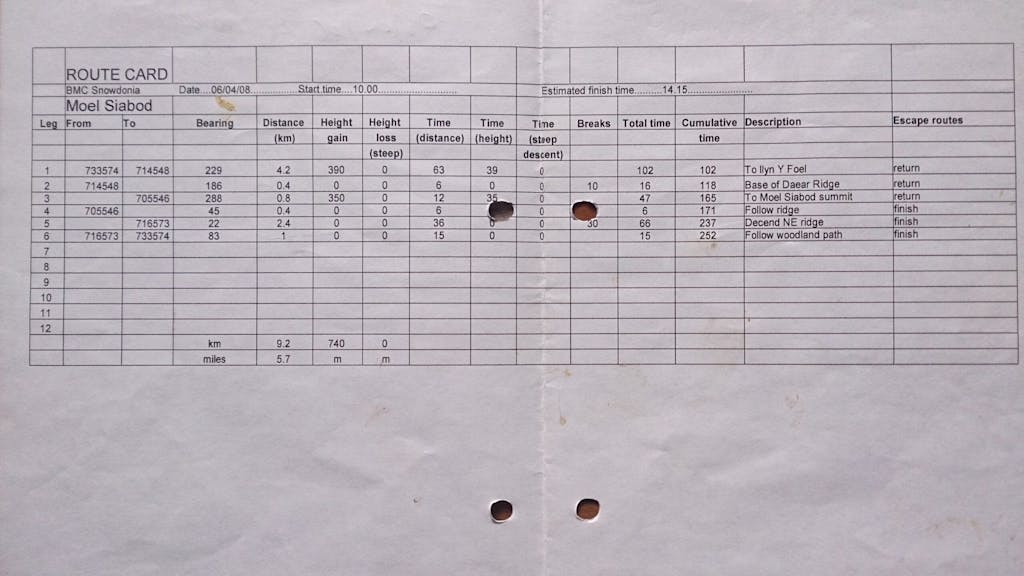
Write a route plan with important information for each navigation leg.
9. If you struggle to manipulate the compass housing when wearing bulky gloves, try wearing lightweight liner gloves underneath. You can then remove the outer gloves and use your compass while still giving your hands some protection from the weather.
10. Accuracy is everything when taking a bearing, a small error in your measurement can lead to you missing your target completely in poor visibility. This is especially true over longer distance ‘legs’ as the error margin increases the further you travel.
Keep your map and compass flat (horizontal) when taking your bearing. Better still, go down on one knee for a more stable platform with some protection from the wind and rain, rest your map on the none kneeling leg.
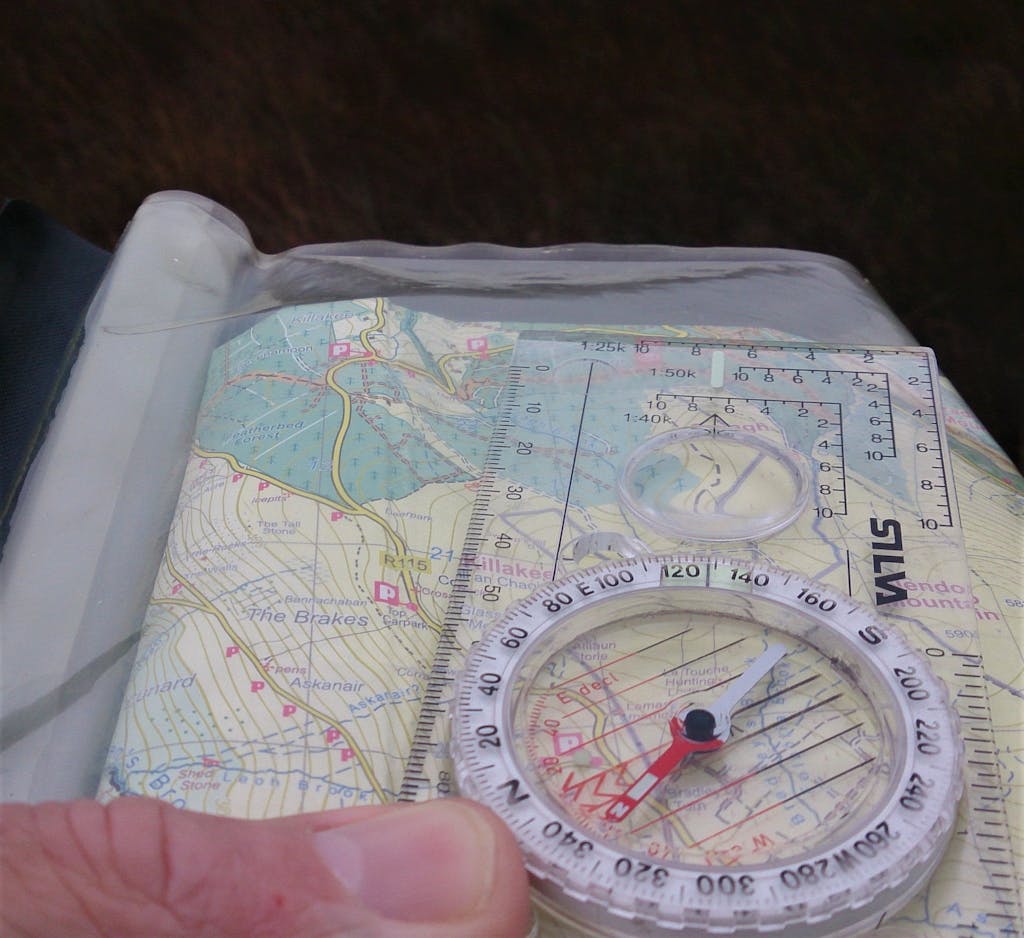
Hold your map and compass flat for maximum accuracy
11. Try to keep navigation legs short, (several hundred metres at most), in poor visibility or during difficult navigation legs. This will help to focus your attention and reduce any error you might introduce in your calculations and when walking on your bearing.
12. When taking a bearing, always estimate it first, there are a number of points during the process of taking a bearing when errors can be made.
Try to envisage the 4 cardinal points (N, S, E, W) and the 4 quadrants of a compass, centred over your start point.
Then for example, if your intended direction of travel is slightly south of west, you will be heading into the third quadrant (between 180° and 270°) and the estimated bearing will be a little under 270°. If your calculated bearing is not between 180° and 270° degrees, then you know you have made an error, and need to check it again. (see below)
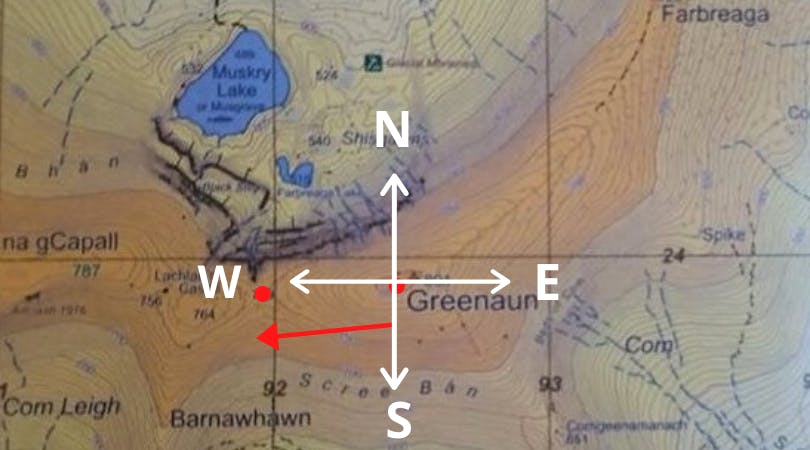
Estimate the bearing before you get out your compass
13. When placing the compass on the map to take a bearing, remember to face the direction of travel arrow on the baseplate AWAY from your current position and TOWARDS your target. This will avoid the classic error of the bearing being 180° out.
14. Make sure the orientation arrow of the compass is pointing north when you are taking a bearing, have the top of the map, which always points to grid north, facing away from you.
If you inadvertently line up the orienting arrow pointing south, the bearing will again be 180° out, an estimation of the bearing as above will soon pick this up. Equally, if you inadvertantly line up the orienting lines with the EAST WEST gridlines you will have an error of 0° or 270°.
Remember to align the compass correctly, and check the bearing with your estimation.
15. Remember to allow for magnetic variation, this usually means a small adjustment by adding a few degrees to your bearing. The magnetic variation differs depending on your location, you can find it somewhere in the margins of your map, usually in the legend.
Check it out before you leave home and remember it, or write it down on your route card.
16. To ensure you are not wandering off the bearing it can be useful, while your start point is still in view, to take a back bearing.
Turn to face your start point and line up the white end of the needle with the orienting arrow, rather than the red end. The direction of travel arrow should now be pointing at the start point.
If it is not move sideways until it does, you are now on the right bearing and can turn back to face your direction of travel.
17. You should try to give yourself three reasons you are in the right place when reaching the end of a navigation leg. Timing, tick features and description will often help with this.
18. A further feature, called a ‘catching feature’ should be identified from the map, and will tell you when you have overshot the target.
Finding your way off the hill in the dark can be very challenging, but by applying the principles above, not impossible.
19. If things go wrong. DON’T PANIC
We have all felt that rising sense of dread when we look into the mist only to realise that we don’t know where we are, or in which direction we should go. At this point it’s important to stop, calm yourself down, and think clearly, maybe even have a little snack or a hot drink.
It’s no good heading blindly on in the hope that you might find a recognisable feature, the odds are stacked against it, and you will only make the problem worse.
20. If things don’t look right and you are entirely unsure about your position, you can line up the white end of the needle with the orienting arrow (put white in the shed).
The direction of travel arrow on the compass housing will now point back the way you have just come. You can follow this back to your starting point, (your last known position). This may be a summit, a col or a distinctive feature you passed.
From here you can orientate the map again, plot your route, and determine your next move and your direction of travel.
___________________________
If you would look like to know more about navigation and feel more confident when out in the hills then join one of our comprehensive mountain navigation courses.
Russ Mills is the founder and owner of Mountaintrails, a guided hiking and mountain training business based in Dublin.