Using the Five D’s in a Navigation Strategy

Long established with trainers and mountain professionals alike, using the five D’s at the beginning of each navigation leg, particularly when first learning these vital skills, ensures that no essential information is missed and adds structure to our decision making process when navigating in the mountains.
Mountain navigation is often complex and difficult, with steep and rocky ground and with the possibility of poor visibility. To make our navigation easier in this challenging environment it is important to break our journey down into a series of manageable shorter sections called ‘legs’. We can then navigate each leg in turn and reach our final goal safely.
At the start of each leg we should consider a number of factors and the five D’s approach ensures we do not miss vital information in our decision making.
Easy to remember and follow, the five D’s* are:
- Distance – (how far is it)
- Duration – (how long will it take)
- Direction – (which way should I go)
- Description – (What will I see along the way)
- Destination – (What should I see at the end of the leg)
We can look at each of these in a little more detail:
DISTANCE
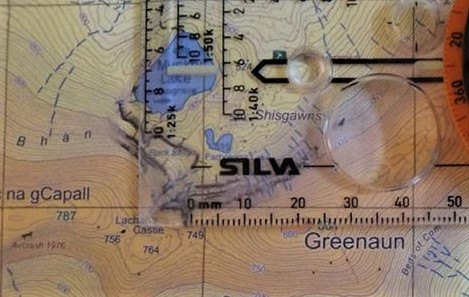
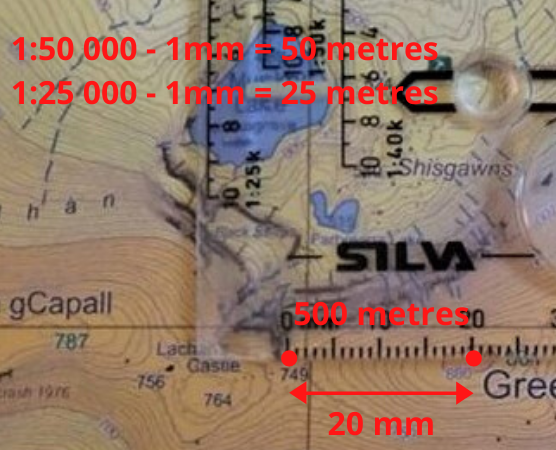
We need to know how far it is from our current position to the end of our navigation leg (destination) to be able to determine the duration. This can be measured from the map using our compass, either the millimetre rule or the Romer scale.

Remember to check the scale of the map:
On a 1:50 000 scale map 1mm equals to 50 metres on the ground.
On a 1:25 000 scale map 1mm equals 25 metres on the ground.
On the above example (on a 1:25 000 map) the distance is 20mm, which is 500 metres on the ground.
DURATION
Having determined our distance, we can now set about calculating the time it takes to travel this distance. To do this we need to know how fast we walk and this varies for each individual, the terrain over which we are walking, the slope of the ground and whether we are fatigued or carrying a heavy load.
Most of us walk between 4 and 5 kilometres an hour on flat ground, but you will need to determine this for yourself.
To calculate the time for a set distance we can use a timing card, this not only speeds up the process but also avoids errors. Simply choose the row for your selected speed and read off the time for your chosen distance.
At 4km an hour over 500 metres it should take 7.5 minutes.

The duration can also be measures by a method called pacing. This involves knowing the number of paces you take to cover 100 metres. By counting the appropriate number of paces you will know when you have reached 500 metres from your start point. Our gait, and therefore our paces per 100 metres, will vary with the angle of the slope and this is a technique that requires lots of practice to get right.
DIRECTION
Possibly the most vital piece of information we need, which direction should we walk in? This can be determined in two ways, and will require a compass.
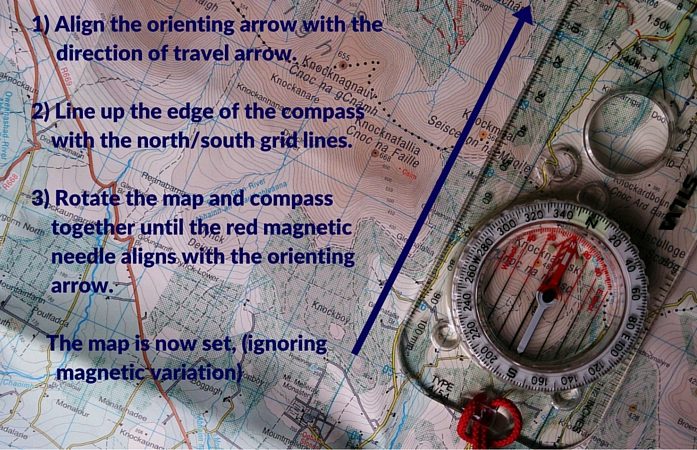
The first option is to orient or ‘set’ the map. This involves lining up the north direction on the map with the north direction on the ground and this can be done with either the landscape you see around you or with a compass.

Once the map is ‘set’ we can determine our direction of travel by looking at our intended route on the map and walking in that direction.
A more accurate method is to take a bearing with our compass. This involves taking a bearing from the map and then following that bearing as we walk.
Taking and using bearings is one of the more complex navigation skills, one that takes most of a day on our Mountain Skills courses to teach, practice and understand. It takes even longer to master this skill and many a navigator has been undone by making an error when walking on a bearing.
For more information on taking and walking on bearing check our blog or go to the Mountaineering Ireland YouTube channel.
DESCRIPTION
An accurate description of what we will see as we walk the leg is essential. After all, how will we know we are going the right way if we don’t know what it’s supposed to look like.
Are there any junctions in our path on the route?
Is there a distinctive feature we can see and note on this leg, the edge of a forest, a stream crossing or a sharp turn in a wall? These are called tick features and are important markers for us to use in our navigation.
Does the ground slope up or down, is the slope consistent or does it change gradient? Are there any distinctive contour shapes we can recognise on the map and look out for on the ground? (This is contour interpretation and a crucial skill to learn when navigating upland terrain.)
For more information on Contour Interpretation check out our blog here.
By checking what we see with what we are expecting to see we will know if we are on the right route.

DESTINATION
We need to know what our destination is going to look like. Is it a hill or a depression (saddle), or maybe the edge of a forest or a junction in a track?
What will happen if we go too far, or miss it to the left or right? If our destination is a hill top (summit) then if we go too far, we will begin to descend again. This is an important bit of information and is called a catching feature as it ‘catches’ us if we overshoot.
Whatever our chosen destination, and it must be an easily recognisable feature, we need to identify it on the map to be able to identify it when we arrive.
By adopting the five D’s when navigating we can be sure we have all the necessary information to complete our individual legs and to ultimately find our way successfully and confidently around the mountains in all conditions.
Russ Mills runs Mountaintrails, a guided hiking and mountains skills training business based in Dublin, Ireland.
