
Contours and Contour Interpretation

Understanding contours and being able to interpret the shapes they make on a map is a very powerful navigational tool.
However, all too often contour interpretation is overlooked in favour of more obvious features such as streams and forests. An experienced and competent navigator will look at the contours early in the process and use the information they provide to make good navigation decisions.

What are Contours?
A map is a 2-dimensional representation of the 3-dimensional world. To be able to depict three dimensions on the flat surface of a map the cartographers employ a number of techniques. The most useful of these is using contour lines.
A contour line joins points of equal height, if you walked around a hill side at exactly 200 metres above sea level and placed a flag every few metres the line joining these flags together would be the 200 metre contour line. It would snake around the hill, in and out of the small valleys and around knolls, always staying at 200m above sea level, creating an imaginary line on the landscape. It is this line that the cartographers put on the map.
To give shape and meaning to the contour lines they are drawn every few metres apart. On most maps they are drawn at 10 metre vertical intervals, but they might be 5, 10, 15 or even 20 metre intervals, depending on the scale of the map and the level of detail provided.
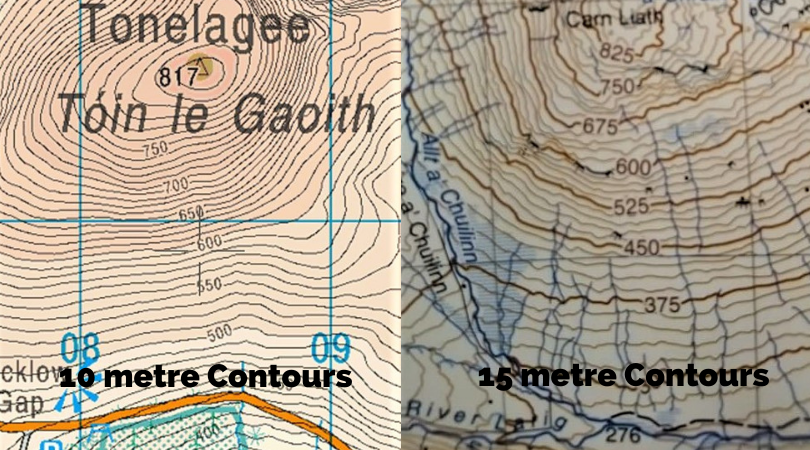
Contour intervals on two different maps
At regular points on the map the contours are numbered, this gives us the height above mean sea level of a particular contour line and helps us to determine the contour interval, the vertical distance between each contour line. In the image above the map on the left has 10 metre contour intervals and the one on the right has 15 metres contour intervals. The numbers also allow us to determine which direction is uphill and which down.
The numbered contour lines are often depicted as thicker or bolder lines and these are called index contours.
When looking at the contours on a map many of you will intuitively know that when the contour lines are close together the ground is steep and when they are well spaced the ground is flatter. This is the beginning of contour interpretation, which really means understanding the patterns that contour lines make on the map.
Interpreting the Patterns
We know that the vertical interval (the distance between) the contours is constant, (in the image below this is 5 metres). If the horizonal distance between each contour is large, as in the valley on the left, then the ground is very shallow. As the horizontal distance decreases and the contours get closer together so the ground steepens, to the point where they almost blend together in one thick black line. We can see this on the NE slopes of Binn Doire Chláir on the image below. On shear vertical cliffs the contours would effectively be stacked one above the other and form a single bold line.
We can use this information to determine which ground is safe to travel over and which slopes may be too steep to negotiate safely.

If we look closely at the contour lines on a map, we can see other patterns emerging. For example, if we look at the tops of the mountains we can see the contour lines forming circle like shapes, or rings, these are indeed called ring contours and denote a summit.
When we are stood on a summit of a hill the ground drops away from us in all directions and this gives us the distinct ring shapes.
If we were to walk down the right-hand slope of the larger hill in the diagram we would be walking down a feature called a spur, which is denoted on the map as ‘v’ shaped or chevron contour patterns. Here the ground descends on three sides (ahead and to each side of us) and goes up on one side (back toward the summit).
As we reach the gap between the two hills there is a small flat area and this is known as a saddle. It may also be called a col or a bealach. Here the ground rises behind us and ahead of us and descends on either side of us and gives a distinctive pattern in the contours.
Where a small valley is cutting into the hillside, the contours look like a series of inward facing arrows or chevrons. The contours here are said to re-enter the hillside and so are called re-entrants.
If you were to stand in this feature the ground would be rising behind you (towards the summit) and on either side of you, but would be dropping ahead of you as you looked down the slope.

These four contour shapes are summarised below.
SUMMIT – Ring contours, ground descends on all 4 sides.
SPUR – Chevron shapes to the contours, ground descends on 3 sides and rises on 1 side.
SADDLE – Flat area between hills, ground rises to 2 sides and descends on 2 sides.
RE-ENTRANT – A valley shape, ground rises on 3 sides and descends on 1 side.
All the features we see in the landscape can be described as one of these four shapes, there are no others, so in learning to recognise these patterns on a map it is possible to interpret the shape of the ground and build a 3-dimensional picture of the landscape around you.
For example, if you look closely at a ridge line you will see it comprises a series of summit, spur, saddle, spur, summit etc.
The sides of the mountain may be cut by a series of valleys and smaller stream features which give a pattern of alternating spurs and re-entrants.
Of course, this simple explanation hides the complexity of mountain landscapes and the almost infinite variety of the four features described above, but they are there, as can be seen in the contour only map of the Maumturk mountains shown below.

Using Contour Interpretation in Navigation
Being able to interpret these patterns in the contours allows the competent navigator to know what the ground is going to look like in an area they have never seen before and to build a 3-dimensional picture of the route they plan to take.
Once mastered contour interpretation is a very powerful navigational tool that will enable us to navigate well in all conditions. By looking at the contours along our line of travel we will know if the ground is going up or down, whether it will level off and for how long, how much height gain there is before we reach the next summit and so on.
In combination with other navigational skills it will even allow us to navigate across open mountainsides in the dark as even with restricted visibility we will know if we are walking uphill or downhill.
It will enable us to locate our position easily by observing the shapes in the landscape around us and referring them back to the map to identify our current location.
We will be able to monitor our progress by using contour features as tick points, to continuously confirm our location and we will know if we have overshot our target by using them as catching features.
Contour Interpretation is a very powerful skill to acquire, but it also requires a lot of practice to master. However when you do, the mountains will be your playground and you will be free of paths and signposts.
Russ Mills is the owner and principle instructor at Mountaintrails.ie , a guided hiking and mountain training business based in Dublin.
